How do I add the Shared SSL through HostMySite.com's Control Panel?
The following article explains how to configure the shared SSL for a website through HostMySite.com's Control Panel. The shared SSL will allow you to provide SSL security to your website, without the cost of a private certificate.
To configure the shared SSL for your website, please follow these steps:
- Open a browser window and go to www.HostMySite.com
- Click on Control Panel Login.
- Log into the Control Panel as one of the following:
- Account Administrator and select the appropriate domain
- Technical Contact for the domain
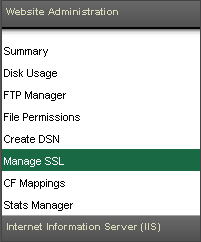
- Click Website Administration and select Manage SSL.
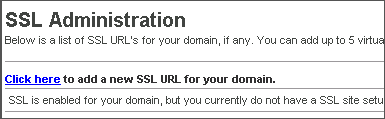
- Click on Click here to add a new SSL.
- Enter the name you want to use for your SSL directory (should be your domain name).
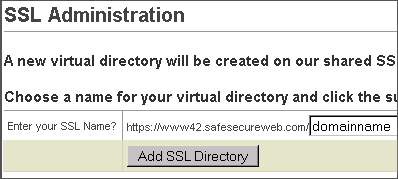
- Click Add SSL Directory.
- The server will then setup the SSL directory name (you can change this or specify up to 4 more if needed by repeating steps 5-7).

To view all of your current shared SSL URLs for your website, return to the Manage SSL page from the Website Administration menu. There you will see list of each shared SSL URL you configured.
Additional Support Topics